Configuring Products
The RevenueCat dashboard allows you to specify what level of access each product should unlock for your users, which can greatly simplify your in-app code to check for subscription access. The dashboard also allows you to configure which in-app products are shown to your users remotely, so you can control how they're presented without the need to update your app. This is great for experimenting how different product configurations affect key subscription metrics.
There are three levels of product configuration available within RevenueCat:
- Products
- Entitlements
- Offerings
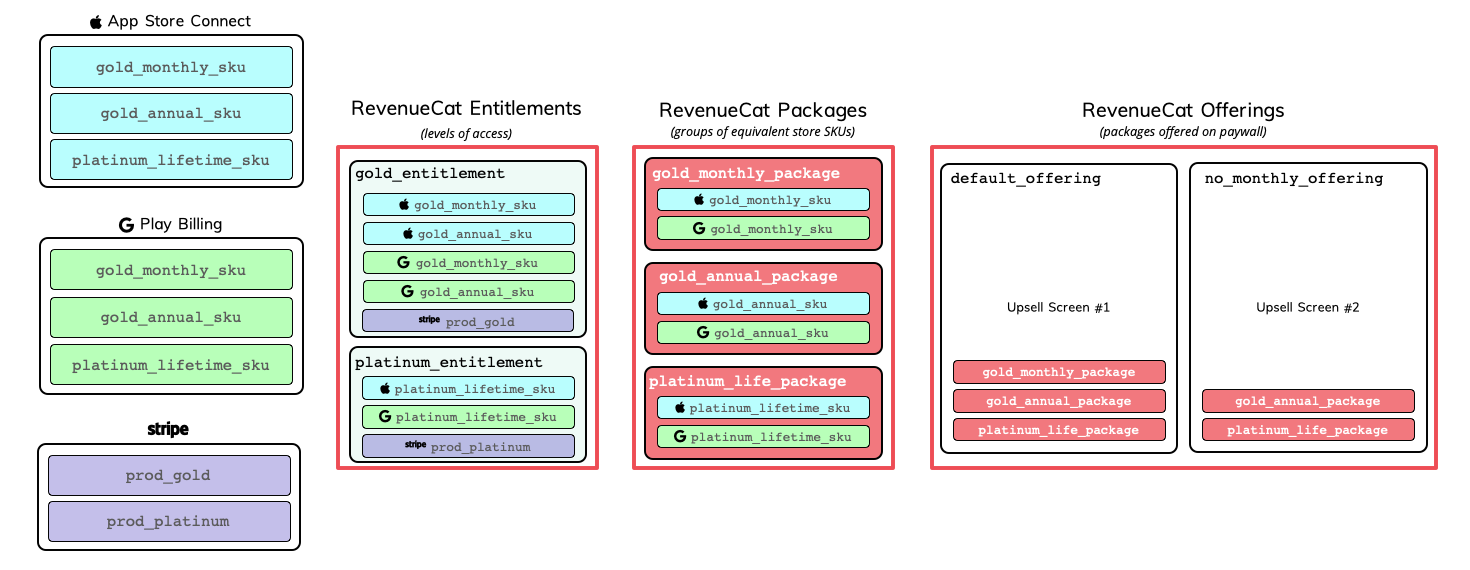
The diagram above illustrates how products from Apple, Google, and Stripe would tie into RevenueCat. The configuration is explained in more detail below.
Products
Products are the individual SKUs that users actually purchase. The stores (Apple, Google, Stripe, and Amazon) process these SKUs and charge the user.
Store Configuration
No matter how you choose to use RevenueCat, you'll need to first have products set up in the stores. This is done outside of RevenueCat, and where you set things like price, duration, and free trials. If you've never set up products before or need a refresher (or tips and tricks) check out these guides:
RevenueCat Configuration
After your products are set up in the stores, you'll also need to set up a 1-to-1 mapping of the products in RevenueCat as well.
Navigate to the Products tab in the settings for your project in the RevenueCat dashboard. To add a new product, click the + New button and enter the product identifier exactly as it appears in the store, as well as the store that the product belongs to.
These product identifiers are the link between RevenueCat, and Apple, Google, Stripe, or Amazon.

After clicking "New", you also have the opportunity to directly import products for the following stores: Apple App Store, subscriptions from Google Play Store. Support for importing from other stores will be added in the future.
If you choose to set up subscription products manually for Google Play apps, you will need to add both the subscription ID and the base plan ID, which you can find in Google Play Console as per the following screenshot:

If a user purchases a product that has not been set up in RevenueCat, the purchase will still go through and be tracked in RevenueCat.
To make it easier to identify your products in RevenueCat, you can optionally set a display name for them by:
- Navigating to a product's configuration page
- Clicking Edit
- Entering your desired display name
- Clicking Save
Product display names must be unique within an app. It's a good practice to include the product duration in the display name to avoid name overlaps, for example: 'My Pro Subscription Monthly', 'My Pro Subscription Yearly' etc".
Product display names are currently supported in Charts, and will be supported throughout the Dashboard in the near future.
Entitlements
An entitlement represents a level of access, features, or content that a user is "entitled" to.
Entitlements are used to ensure a user has appropriate access to content based on their purchases, without having to manage all of the product identifiers in your app code.
Most apps only have one entitlement, unlocking all premium features. However, if you had two tiers of content such as Gold and Platinum, you would have 2 entitlements.
A user's entitlements are shared across all apps contained within the same project.
Creating an Entitlement
To create a new entitlement, click Entitlements in the left menu of the Project dashboard and click + New. You'll need to enter a unique identifier for your entitlement that you can reference in your app, like "pro".
Most apps only have one entitlement, but create as many as you need. For example a navigation app may have a subscription to "pro" access, and one-time purchases to unlock specific map regions. In this case there would probably be one "pro" entitlement, and additional entitlements for each map region that could be purchased.

Attaching Products to Entitlements
Once entitlements are created, you should attach products to entitlements. This lets RevenueCat know which entitlements to unlock for users after they purchase a specific product.
When viewing an Entitlement, click the Attach button to attach a product. If you've already added your products, you'll be able to select one from the list to attach.
.png")
When a product that is attached to an entitlement is purchased, that entitlement becomes active for the duration of the product. Subscription products will unlock entitlements for the subscription duration, and non-consumable and consumable purchases that are attached to an entitlement will unlock that content forever.
If you have non-subscription products, you may or may not want to add them to entitlements depending on your use case. If the product is non-consumable (e.g. lifetime access to "pro" features), you likely want to attach it to an entitlement. However, if it is consumable (e.g. purchase more lives in a game) you likely do not want to add them to an entitlement.
Attaching an entitlement to a product will grant that entitlement to any customers that have previously purchased that product. Likewise, detaching an entitlement from a product will remove it for any customers that have previously purchased that product.
When designing your Entitlement structure, keep in mind that a single product can unlock multiple entitlements, and multiple products may unlock the same entitlement.

When relying on entitlements to enable access to certain content, it's important that you remember to add new products to their associated entitlements if needed. Failing to add your products to an entitlement, could lead to your users making purchases that don't unlock access to the promised content.
Offerings
Offerings are the selection of products that are "offered" to a user on your paywall. They're an optional, but recommended feature of RevenueCat that can make it easier to change and experiment with your paywalls.
Offerings allow you to choose which combination of products are shown to a user on your paywall or upsell screen. For example your default Offering may contain a monthly and annual subscription, but you might want to experiment with Offerings with a different combination of subscription durations, trial lengths, prices, etc.
Within each Offering, there must be one or more Packages. Packages are simply a group of equivalent products across iOS, Android, and web. If your app is available on multiple platforms, then a Package would contain all of the equivalent product Ids from each platform.

Creating an Offering
To create an Offering, navigate to the Offerings tab to your project settings in the RevenueCat dashboard, and click + New to get started.
You'll be prompted to enter an Identifier and Description for your offering. Note that the offering identifier cannot be changed later. Once you've entered this information, click Add.
.png")
Current Offering
The RevenueCat dashboard allows you to choose which Offering should be current. The current Offering is a convenience method for the Purchases SDK to reference a primary Offering.
If you build your paywall to reference the current Offering, instead of hardcoding an identifier value, you can change this Offering from the dashboard to dynamically display different Offerings at any time. We strongly recommend utilizing the current Offering feature. See Displaying Products for more info.
Adding Packages
Each Offering you create should contain at least one Package that holds cross-platform products.
To create a package, click into your new Offering, then click + New in the Packages section. In the popup, choose an Identifier from the dropdown that corresponds with the duration of the package. If a duration isn't suitable for your package (e.g. consumable purchases), then you can choose a custom identifier. Include a Description, then click Add.

Click into the newly created package and begin attaching product by clicking Attach.

On the next screen, you'll see dropdowns to select the appropriate product for each store. Choose the appropriate products, then click Attach.

For Google Play store products, if you select a non backwards-compatible product and the app compatibility setting is set to "SDK v6+ and backwards compatible", you will have the ability to configure a backwards compatible fallback product. This product will be available for purchase in previous versions of the SDK which don't yet support non backwards compatible products.

Any product can be added to an Offering, even if it's not part of any Entitlement. This can come in handy if your app's paywall contains a combination of subscription products that unlock Entitlements, and consumable products that do not.
Continue this process until all of the packages are created for your Offering, and all Offerings are created.
The packages within an offering can be updated at any time, and their display order can be modified by dragging their position in the table. This display order will be reflected in the SDK when you fetch Offerings.
.png")
Removing Packages
Packages can be removed from an Offering at any time. This can be useful if you want to update your paywall on-the-fly without an app update.
Removing a package from an Offering does not remove the products from RevenueCat, remove transactions, or remove the products from any Entitlements. You can re-add a package and products at any time.

Next Steps
You've successfully created Entitlements, Offerings, and Packages, and have attached products to be used in your app.
Continue on to Displaying Products to start showing your new Offering in your app.